Custom Model
It is possible to import 3D Models into the game, complete with their own diffuse, colliders, sounds, specular intensity and more!
Importing Custom Model
In-game, navigate to the top of your screen and select Objects > Components > Custom > Custom Model.
Importing Assets
How you choose to import files impacts if other players can see them when you're finished.
For help with importing, visit Asset Importing.
Import Options
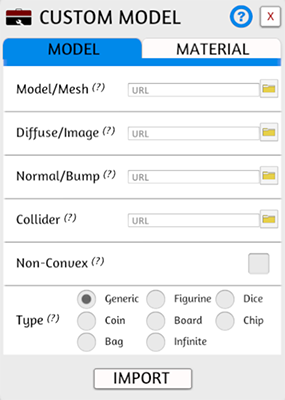
There are two tabs, Model and Material, which contain all the options for importing a single model.
Model Options
These options determine the basic, physical aspects of the custom object.
| Setting Name | Description |
|---|---|
| Model/Mesh | (Required) The model for the 3D object. |
| Diffuse/Image | (Required) The primary material for the object. |
| Normal/Bump | Normal/bump map image for the object. |
| Collider | Customized collider. By default, a simple collider is generated automatically. |
| Non-Convex | If the object is non-convex. |
| Type | The model's type. See the Model Type section. |
Material Options
| Setting Name | Description |
|---|---|
| Material | Determines the fault material settings, as well as the audio profile used for when the 3D object collides with others. |
| Specular Intensity | The level of specular intensity. |
| Specular Color | Specular color setting. |
| Specular Sharpness | Specular sharpness setting. |
| Fresnel Strength | Fresnel Strength setting. |
| Cast Shadows | If the object casts shadows. |
Read more about Specular Settings and Fresnel in the Unity Documentation.
Model Type
When making your model, you can decide what the model will be used for. Each selection has its own special attributes.
| Setting Name | Description |
|---|---|
| Generic | • No special attributes. |
| Figurine | • Automatically rights itself when picked up into its "vertical" orientation. |
| Dice* | • Randomizes object rotation when shaken or the "roll" key is used. • Number keys will cause it to face a given direction. |
| Coin* | • Randomizes object rotation when shaken or the "roll" key is used. • Object flips up into the air when released after being shaken. |
| Board | • Object accepts grid projections by default. • Alt-zoom will not work on it. • It ignores hidden zones, always remaining visible. |
| Chip | • Object can stack with others of its own type. |
| Bag | • Can contain other objects dropped onto it. |
| Infinite | • Like a bag, but it contains an infinite number of the first object placed into it. |
* Values can be assigned to these objects, just like regular or custom dice have. See the rotation vector tool section for details.
Custom Model Tips
Making custom objects allows for a lot of freedom, so here are some guidelines you will need to follow when creating your models.
Valid File Formats
- Model/Mesh file format:
.obj - Collider file format:
.obj - Image file format:
.jpgor.png
Model Tips
- Triangulate all meshes/models to avoid holes.
- Make sure the normals on your mesh are facing the right direction.
- Set the origin point of the model to the center of mass for best physics. Objects in TTS rotate around their origin point.
- Don’t go crazy with poly counts, use a normal map to add fine detail.
- Keep the vertices below 25k for best results, as any higher your objects may not import and/or crash your game.
- If you want to access additional elements for importing a Model, you might be interested in Custom AssetBundles instead.
Collider Tips
- If you do not specify a custom mesh collider .obj, then the game will calculate a box collider to fit your object.
- Custom mesh collider is just a way for you to have a collider that isn’t a box.
- Only use a custom mesh collider if a box collider will not work, due to performance.
- Box colliders are much more optimized in the physics engine.
- It’s best to use a simplified version of your model with less than 255 triangles. (As simple as possible)
- If your model is already sufficiently low poly enough you can use the same for the Custom Mesh Collider.
Non-Convex Tips
- Non-convex colliders allow collisions to work like the Chinese Checkers board which has indents and is concave.
- Convex colliders will fill in any indents or holes in the mesh due to how it calculates the collider.
- The problem with non-convex colliders it only works properly on locked object.
- If you need concave colliders and also need the object to move then you must use compound colliders.
Compound Collider Tips
- Compound colliders are multiple meshes inside one .obj file that create multiple colliders on a singular object.
- Compound colliders allow you make concave shapes and get around the fact that you can’t have non-convex colliders that move.
- Break you mesh into multiple convex shapes then export them in a single .obj file to create compound colliders.
- Non-convex should be set to false (unchecked) when using compound colliders.